

I got a hand-delivered invitation a few weeks ago for a Favorite Things Party. This is the first time I had heard of such a party, and it ended up being a lot of fun.
Here's how it works: each person brings their favorite thing (anything you like... your favorite food, lip gloss, favorite kitchen tool, etc.). It can't cost more than $6, and each person brings four
of the same thing. When you arrive at the party, you write your name on a slip of paper and throw them in a big bowl. The bowl is passed
around, and each person takes four names (making sure you don't pick
your own). As names were picked the favorite things are introduced. Then each person goes home with four different items.
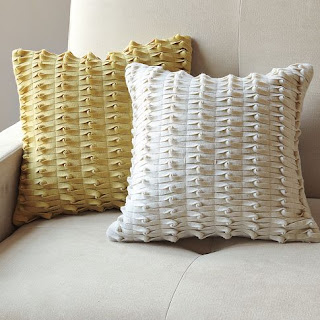
Even though I was given the invitation a couple weeks prior to the party, the procrastinator in me waited a bit too long to get on it. I love pillows so I had decided to make four pillows using this as inspiration.
When I told my husband about my idea he questioned whether I had enough time to make it (I decided to start making them just a couple days before the party). I said, "Of course, it can't be that hard"
Well as it turned out, my husband was right, and I ran out of time. I got two finished, the third just needed a zipper, and I had the fourth all cut out but not sewn. When my husband came home from work just a couple hours prior to the party he saw that I was stressed and a little panicked. He offered to run clear across town to Sherwin Williams to get a couple of my favorite products from their store. I was so grateful he didn't say, "I told you so." He's cool like that.
Anyway, I'm really sad I didn't finish all of them in time for the party, but in reality I took something I probably love more than pillows: my favorite brush and paint pail.
This pillow was tricky to figure out. However, after making four of them I think I finally figured out the tricks and I'm going to share with you how you can make it look more like West Elm's than mine turned out. I do love the texture but to call mine a "knock-off" isn't very accurate. Here is a quick tutorial on how I made the pillows.
The amount recommended should make two 16" pillows. I know the West Elm has eight rows versus the six rows on my pillows. So you can adjust your measurements if you'd like more rows.
The amount recommended should make two 16" pillows. I know the West Elm has eight rows versus the six rows on my pillows. So you can adjust your measurements if you'd like more rows.
Materials:
- 1 1/2 yards of premium felt off of a large bolt (not craft felt but the little more expensive felt, it was about $7.99 a yard)--again, this will make two pillows. They do have wool felt which would work great; it's more expensive and comes in a smaller bolt. I didn't see the wool felt when I went shopping, otherwise that is probably what I would have bought.
- 14" zipper
- thread
- cutting board and cutting wheel (not necessary but very helpful)
1) Cut out four 18" squares.

2) Cut out 1/2-inch strips with remaining material. When cutting them out, be sure to maximize the length of the strips as opposed to cutting lots of short ones.

3) Divide your 18" x 18" square. Every three inches lightly draw a line with a fabric pencil. I actually used pins instead, but would recommend marking it to avoid poking yourself with the pins.


4) Arrange the strips on the pillow. For the first row you'll need to cut strips to form the loops. My strips were 3 1/2 inches long. The loop will meet halfway between the end of the square and the first pin (about 1 1/2 inches) as shown in the picture below.


You can choose how much space you want from loop to loop, but mine are about a 1/2 inch between each loop.
5) Sew the edge. I tried to stay as close to the edge as possible.

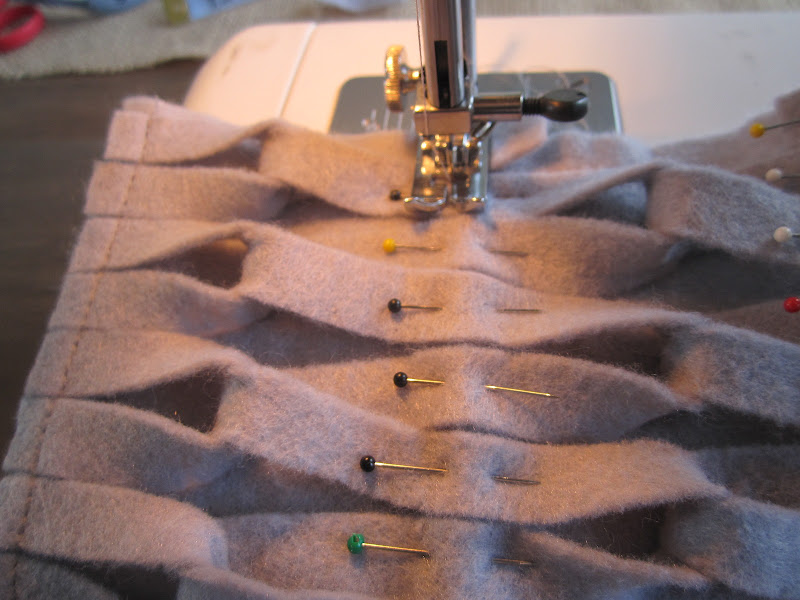
6) Arrange the second row. Start your fabric a little past your first 3" mark, then lace it through the loops of the first row. You will need to double the length between each loop because you will sew right down the middle. Refer to the picture below.

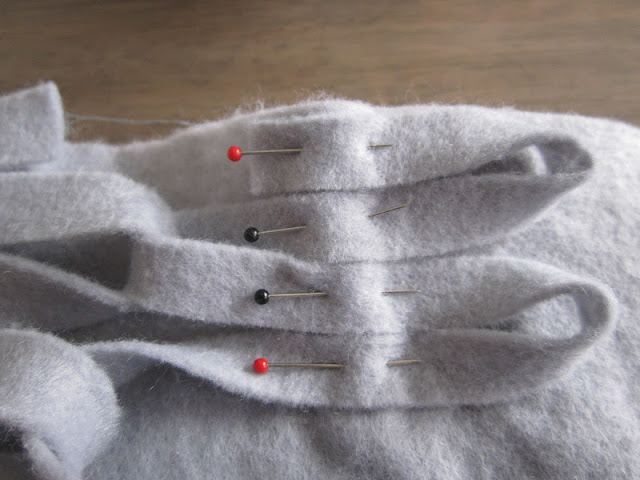
When looping pull tighter than I did in the above picture. You want it to look more like the loops pictured below. Unfortunately it only took me to get to the last row of loops to figure it out. I would normally fix it but after making four of these pillow...I had had enough.

7) Sew right down the middle of the loops. You can mark the middle if you'd like, but I just eyeballed it.

Again, by pulling a little tighter on the loop you'll create the "knot" that is on West Elm's.
8) Repeat. Start the next row of loops the exact same way as the last but mirrored like so:

9) Repeat steps 6-8 until you get to the end.


9) Repeat steps 6-8 until you get to the end.
10) Arrange the last strip of loops like in steps 4 and 5.
11) Sew on zipper. I started writing a tutorial, but as I was writing it I decided to see if I could just find a video tutorial for you. I found a great one here.
12) Sew the front and back of pillow together. Sew right sides together as shown below. I sewed a 1/2-inch seam allowance.


13) Cut corners and turn right-side-out.

Here it is all finished, imperfectly hand-made, in a hurry.

Linking to:
Under the Table Dreaming
Mop it up Monday
I made the world cuter today

Linking to:
Under the Table Dreaming
Mop it up Monday
I made the world cuter today
I am genuinely impressed! First that you figured out how they made it, and second that you made four! I can't even sew!
ReplyDeleteThanks Erica! You are so nice!!
DeleteOh my goodness!! My telepathy has traveled 1,400 miles...no seriously this is just what I need. I have been thinking of a pillow project. You see I bought some deep purple ones because they were only $5 they are a silk fabric so they never stay up on my couches...they don't match perfectly either. I thought of buying a fabric and sew some new ones, but I have too many patterns in the room. So this is just absolutely PERFECT! I don't know if I can pull it off, but I will surely try. You are simply amazing! I miss you and love you tons!
ReplyDeleteToo funny!! Well if you decide to make it I know you will do a great job. You're a great little seamstress. :) Love and miss you more!!!
DeleteYou have a sweet hubby to do that - but I gotta tell you - if you had brought these pillows, and I was lucky enough to have drawn your name, I would have LOCKED THE PILLOW IN MY CAR for safekeeping to prevent anyone from suggesting a pink elephant (or whatever those parties are where folks trade their goodies) - omw these are GORGEOUS!!!
ReplyDeleteYou are too cute!! Thanks for the sweet comment!
DeleteA-mazing!
ReplyDeleteThanks Jamie!
DeleteI think it looks absolutely amazing!!
ReplyDeleteclever you.
thanks so much for sharing how you did it.
cheryl xox.
Thanks Cheryl, you girls really know how to make my day!
DeleteWow, what a great pillow! And I'm really impressed with how you figured it out! I wouldn't have known where to start, but your tutorial is so simple to follow. On the plus side of not getting them done in time, at least you have some great gifts for people/yourself!
ReplyDeleteThanks Rhiannon. I'm glad my tutorial makes sense! I agree, it really is great to have a couple new pillows. :)
DeleteLOVE LOVE LOVE!!!!! I think even I can make these!! Going to try.
ReplyDeleteThanks for sharing! Keep up the fab ideas! xoxo
Glad you like it Sandy! :)
DeleteWow that's impressive. I am pinning this one on my things to make board. Great job.
ReplyDeleteThanks Judy!
DeleteImpressed to say the least! Wow...now that's talent.
ReplyDeleteThanks you!
DeleteI think you did a great job. I'm definitely going to try this one.
ReplyDeleteI hadn't seen this before. Great tutorial! I guess I have to make some for my daughter. Thanks for sharing your expertise and creativity.
ReplyDeleteSuper cute Kristi!
ReplyDelete(and I know your paint supplies were much loved too!)
Good job! But then I am never surprised by what you will attempt. I love em!
ReplyDeleteI love the pillow! I just got the exact same curtains for my living room!
ReplyDeleteThank you! That's awesome you have the same curtains; I like your style! ;)
DeleteJust pinned your pillow....I love this design! I can't sew to save my life, but my mother is a very talented seamstress, and I'm sure she will make one for me! Thank-you for taking the time to share! Tanya. (from Nova Scotia, Canada.)
ReplyDeleteYou can contact me at kriskrafting@gmail.com
ReplyDeleteThis comment has been removed by the author.
ReplyDeleteHi Kristi,
ReplyDeleteYour blog is awesome!! Love it
Awesome!!!!!
ReplyDeleteam wondering if these could be made into shams for a bed?
ReplyDeletevery nice thank you so much ^_^
ReplyDeleteYou should put these on your etsy shop :)
ReplyDeleteBeautiful pillow! How long did you make the strips (ie. how wide was your fabric)?
ReplyDeletemuy buen tutorial, gracias por compartirlo
ReplyDeleteHERMOSO, DIVERTI Y ESPECTACULAR. EL TUTORIAL MUY CLARO. MUCHAS GRACIAS.
ReplyDeleteI couldn't refrain from commenting. Exceptionally well written!
ReplyDeleteFeel free to visit my website :: Bmi calculations
This is awesome! I love examining pillows and figuring out how they did it. Great tutorial btw as well. Will be using it in the future.
ReplyDeleteKim@reposhture.blogspot.com
always i used to read smaller articles that also clear their motive, and that is also happening with
ReplyDeletethis article which I am reading now.
Feel free to surf to my web page :: Cheap Party Pills
Нello to every body, it's my first visit of this website; this webpage contains amazing and actually excellent stuff designed for readers.
ReplyDeleteMy homepage ... Premature ejaculation Pills
After Ι originаlly commented I ѕeem to
ReplyDeletehave cliсκed on the -Nοtіfy me whеn new comments are added- cheсkbοx anԁ
fгom nοω on each timе a соmment
iѕ aԁded I gеt 4 еmaіls with the samе cοmment.
Perhаpѕ therе is аn еаsy method you can remοve mе from that service?
Kuԁoѕ!
Also νisit my page: herbal highs nz
I love whаt you guys aгe usually uρ tοo.
ReplyDeleteThis kind of сleѵer wοrk and eхpοsuгe!
Κeеp up the fantastic works guys Ι've added you guys to my own blogroll.
Feel free to visit my web blog; legal ecstasy
Tie extremely tightly a dental floss all over the stalk of the afflicted pores and
ReplyDeleteskin area. Several therapeutic lotions incorporate calcium milk powder.
Have a look at my webpage :: dermatend mole removal
I'm gone to inform my little brother, that he should also go to see this website on regular basis to get updated from most recent reports.
ReplyDeleteFeel free to surf to my webpage legal highs online
Thank you so much for taking the time to write this exceptional tutorial. I'm currently in the process of making two white versions of this pillow for my 26"x26" European shams. Such great texture!
ReplyDeleteam going to do this with ribbon!!! I love it.
ReplyDeleteIn the process of making a green version now. My strips aren't long enough to go the full length so I will have to join them, are there any tips for joining the strips to make the join not so obvious? I can't come up with a clean way of doing it. Also when you constructed the pillow, i.e. attached the front and back, did you trap some of the first set of loops in the stitching? Is there a tip for preventing the loops from getting caught?
ReplyDeletevery nice job -on the pillows and the tutorial. I really appreciate your taking time to show us all the steps!
ReplyDeleteOh wow, you make it look so easy. I would have never figured out how the knot was done.
ReplyDeleteI would do this with ribbon and for a lamp shade..
Love you for sharing
I think it is beautiful work n am defi goi g to try it myself. Thabk you for sharing.
DeleteI have noticed something that may make the cushions turn out better for anyone trying to make them now (as I am).
ReplyDeleteIn the tutorial when the strips are being laid down as in step 6 the strips are twisted as they enter the loops on the left. this means that the wide part of the strip shows in the 'knot' and the knot does not look tight.
in the West Elm cushions, this twist doesn't happen. Only one side of the felt strips is ever shown. Imagine each strip has a side A and a side B. When sewing the strips down, you want to be sure that you only have either side A or side B facing up but definitely not both. This will give the knots more definition.
If you take a look at the photograph in step 6 above, the first loop on the far right is correct (with the black pin going through side A and then the yellow pin going through side A). This makes the loop look puckered and tight.
The next loop on the left is twisted so the felt is lying flat in the loop. The second black pin down is pinned through side B of the felt strip.
I hope I explained this well enough for anyone else following this tutorial!
Wow that's impressive. I am pinning this one on my things to make board. Great job.
ReplyDeletefloral embroidered pillow
Baby Girl Nursery Pillow
burlap pillow cases wholesale
King Casino Review for 2021 - Macmerit MacMines
ReplyDeleteKing Casino has a great 카지노 reputation due to operating under their management. The casino is an excellent entertainment venue for serious Rating: 메리트카지노 4.6 · Review by Macmerit
that is a genuinely properly website online post. No longer too many people might genuinely, 검증커뮤니티
ReplyDelete@Kristi: thank you, great idea! I can't watch the YouTube video...it's private
ReplyDelete